
 Written by Martin Muzatko
It feels so effortless to use range sliders. They help to have a custom overview of what you can actually buy from your money, or you want to have only the recently added items displayed. But implementing this functionality requires you to know how to wire together the logic with your data. And then you still have to push the results to the DOM somehow, while taking care of performance.
You do not have to get lost in the event handlers and DOM manipulation functions of your dynamic web-app. You can learn how to build range sliders into your projects today.
By completing this tutorial, you will learn
- How to configure noUiSlider to work as live filter for your items
- How to connect your data with the rangeslider
- How to filter your data based on a range between two numbers
- How to integrate the slider with your existing codebase
To give you an idea how the range slider itself will work, move around the handles in the example below.
Get noUiSlider and set it up
Grab a copy of noUiSlider if you haven't already. Use your favorite package manager or include the sources as script and link element.
If you haven't checked their documentation already, you will see that a slider is set up in almost no time. Don't get distracted by the many possibilities with this tool, we will focus on the price range filter for now.
If you use a module bundler:
npm i -S nouislider wnumb
import noUiSlider from 'nouislider'
import wNumb from 'wnumb'
Or if you prefer managing dependencies on your own:
<script src="https://unpkg.com/nouislider@10.0.0/distribute/nouislider.min.js"></script>
<script src="https://unpkg.com/wnumb@1.1.0"></script>
<link rel="stylesheet" href="https://unpkg.com/nouislider@10.0.0/distribute/nouislider.min.css">
Create an element (it can be a <div> with a class or an ID) all configuration is done using javascript.
The value for start can be used to place multiple handles to create a range slider. For now, we set them to fixed values, so we can see the slider in action. With this, you will get a range slider that looks like the one in the top of the article.
If you load the resources before the following script, you don't need a document ready event.
<div style="margin: 4em" class="regular-slider"></div>
<script>
var regularSlider = document.querySelector('.regular-slider')
// wNumb is their tool to format the number. We us it to format the numbers that appear in the handles
var dollarPrefixFormat = wNumb({prefix: '$', decimals: 0})
var slider = noUiSlider.create(regularSlider, {
    // two handles
    start: [20, 60],
    // they are connected
    connect: true,
    // their minimal difference is 5 - this makes sense, because we want the user to always find items
    margin: 5,
    // tooltip for handle 1 and handle 2
    tooltips: [dollarPrefixFormat, dollarPrefixFormat],
    pips: {
        mode: 'steps',
        density: 5,
        format: dollarPrefixFormat
    },
    // start and end point of the slider - we are going to calculate that later based on a set of items
    range: {min: 0, max: 100}
})
</script>
How does the data look you will have to filter? Ideally, you will have an array of objects. With each object containing properties to describe how the item is named, how much it is and other chracteristics.
Note
This is what comes from the server. So you have to care about how to process and display the items. I understand that this is not always true, because in most applications and hobby projects, you'll have to take care abouth both. So feel free to shoot me an email to talk about how you can implement this tutorial code with yours.
Depending on your backend architecture, you should fetch the data using AJAX and then start processing and filtering the data. Below you can find how this data could look like.
var items = [
    {
        name: 'Mediocre GPU - Lasercookie',
        vendor: 'Just stuff',
        build_year: 2017,
        price: 79,
        available: false
    },
    {
        name: 'Gaming Ferret 3872 - Computer mouse',
        vendor: 'Laughterhouse',
        build_year: 2014,
        price: 44.5,
        available: true
    },
    // ...
]
So how do you filter these items? This is as simple as calling the Array.filter function together with what we already know. Our range that consists out of two values: start of range and end of range. We will call that function when we obtain the values from the range slider, which is explained after this code.
function filterItems(items, price) {
    return items.filter(item => {
        return item.price >= price[0] && item.price <= price[1]
    })
}
So now that you got the filter function and the slider set up, you need to interact with the values.
You can use the element we already set up. The variable you set when you initialize the slider has all the functions you need to listen for updates. Actually, you can listen to update, slide, set, change, start or end events. The change event gets triggered only after you dropped the handle again. But you want to have changes happen immediately - you want to have a live search. Which is why you can use the update event. You can find out when which event fires, by having a look at the official documentation for events.
slider.on('update', function(values){
    let filteredItems = filterItems(items, values)
    renderItems(filteredItems)
})
There is a function we haven't covered so far: renderItems(). Before we get to that, lets have a look on the potential HTML structure where we render the items to.
<h2>Price</h2>
<div class="slider"></div>
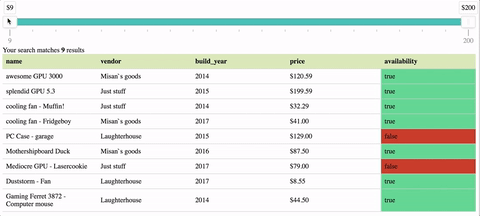
<span class="counter">Your search matches <b>0</b> results</span>
<table>
<thead>
<tr>
<th>name</th>
<th>vendor</th>
<th>build year</th>
<th>price</th>
<th>available</th>
</tr>
</thead>
<tbody class="results">
</tbody>
</table>
To pull everything together, this is what the range slider together with the results has to perform:
- Step 1: Show all items
- Step 2: Detect slider update
- Step 3: Filter based on range and a property of the items (price)
- Step 4: Render new items We covered 2. and 3. so far.
You should work with a template you can re-use instead of manually manipulating the DOM everytime. Because interaction is a cycle, the user can start from step 1 again. If you are coming from jQuery, this is a fundamental shift in the mindset how to create dynamic content. I'm showing you how.
function renderItems(items) {
    var counter = document.querySelector('.counter')
    counter.innerHTML = `Your search matches <b>${items.length}</b> result${items.length == 1 ? '' : 's'}`
    var table = document.querySelector('.results')
        table.innerHTML = items.map(item => `
        <tr>
            <td><span>Name</span>${item.name}</td>
            <td><span>Vendor</span>${item.vendor}</td>
            <td><span>Build year</span>${item.build_year}</td>
            <td><span>Price</span>${item.price} $</td>
            <td style="background-color: ${item.available ? '#58D288' : '#C43828'}"><span hide-gt-sm>Available</span>${''+item.available}</td>
        </tr>
        `
    }).join('')
}
Word of caution here
Using innerHTML is not the most performant way but it gives you the quickest results in terms of development. This works but it is not the right way. A more complex but more performant way is using createElement. That is what most of the frameworks and UI libraries use to support high framerates for heavy operations.
With this, we have everything we need to dynamically show the filtered content. Live! No forms to submit.
Now take a deep breath, use the interactive slider with the table below.
| Name | Vendor | Build Year | Price | Available |
|---|---|---|---|---|
| Laserferret - Gamingmouse | Warecave | 2014 | 38 $ |
In the code above, you can also see the bonus I talked about in the beginning. With the getPriceRange function, you can determine the mininmum and maximum price of your array.
There are so many other aspects to make this component useful in real world applications. A lot of options can be fine-tuned to make them work for any situation and set of items. To just name a few:
- Proper zero padding for pricetags
- Extra filters for other criterias (build year, vendor, etc)
- Checkout process
You can combine this example with so many other features to offer an effortless user experience. Sortable columns, filters for every column, full text search. Get on my email list to learn how to combine all these and a lot more with your forms to avoid unnecessary interactions that slow down your users.
How do you charter unknown server territory?
Don't get stuck connecting forms and servers.
Get free on-spot advice delivered to your inbox.